
Table of Contents
فوائد استخدام دعامة الإبرة 209007 ذات الحلقة السفلية في ماكينات الخياطة المنزلية
نصائح لتثبيت وضبط دعامة الإبرة المنحنية 209007 السفلية بشكل صحيح
أولاً وقبل كل شيء، من المهم التأكد من أن لديك حامل الإبرة الصحيح لطراز ماكينة الخياطة الخاص بك. تم تصميم الحلقة السفلية 209007 للعمل مع الآلات التي تتطلب إبرة منحنية، لذا تأكد من مراجعة دليل جهازك أو استشارة أحد المحترفين لضمان التوافق.
بمجرد التأكد من حصولك على دعامة الإبرة الصحيحة، والخطوة التالية هي تثبيته بشكل صحيح على ماكينة الخياطة الخاصة بك. ابدأ بإيقاف تشغيل الجهاز وفصله من مصدر الطاقة لتجنب أي حوادث. قم بإزالة دعامة الإبرة القديمة بعناية، إن أمكن، باتباع إرشادات الشركة المصنعة.
بعد ذلك، خذ دعامة الإبرة الجديدة 209007 السفلية وقم بمحاذاتها مع الفتحة المخصصة في ماكينة الخياطة الخاصة بك. قم بتحريك الدعامة برفق إلى مكانها، وتأكد من تثبيتها بشكل آمن. تحقق مرة أخرى للتأكد من محاذاة الدعامة وتثبيتها بشكل صحيح قبل المتابعة.
بعد تثبيت حامل الإبرة، من المهم ضبطه على الموضع الصحيح للحصول على نتائج خياطة مثالية. ابدأ بإدارة العجلة اليدوية على ماكينة الخياطة الخاصة بك لخفض الإبرة إلى الحامل. يجب وضع الإبرة في منتصف الدعامة، بحيث تكون عين الإبرة متجهة نحو الجزء الأمامي من الماكينة.
بمجرد وضع الإبرة بشكل صحيح، اضبط الشد على الحلقة السفلية لقوس الإبرة 209007 لضمان خياطة سلسة. تحتوي معظم آلات الخياطة على مقبض أو قرص لضبط الشد يمكن استخدامه لشد أو تخفيف التوتر الموجود على حامل الإبرة. قم بتجربة إعدادات شد مختلفة حتى تجد الإعداد الأفضل لمشروع الخياطة الخاص بك.
بالإضافة إلى ضبط الشد، من المهم أيضًا التحقق من محاذاة حامل الإبرة مع المكونات الأخرى لماكينة الخياطة الخاصة بك. تأكد من أن حامل الإبرة موازٍ لكلاب التغذية والقدم المكبس لمنع أي مشاكل في الخياطة. انتبه جيدًا لجودة الغرز وقم بإجراء أي تعديلات ضرورية على شد أو محاذاة الدعامة حسب الحاجة.
في الختام، يعد تثبيت وضبط دعامة الإبرة المنحنية 209007 السفلية بشكل صحيح أمرًا ضروريًا لتحقيق نتائج خياطة ذات جودة احترافية. باتباع النصائح الموضحة في هذه المقالة، يمكنك التأكد من إعداد ماكينة الخياطة الخاصة بك بشكل صحيح لتحقيق النجاح. تذكر مراجعة دليل جهازك أو طلب المساعدة المتخصصة إذا واجهت أي صعوبات أثناء عملية التثبيت أو الضبط.
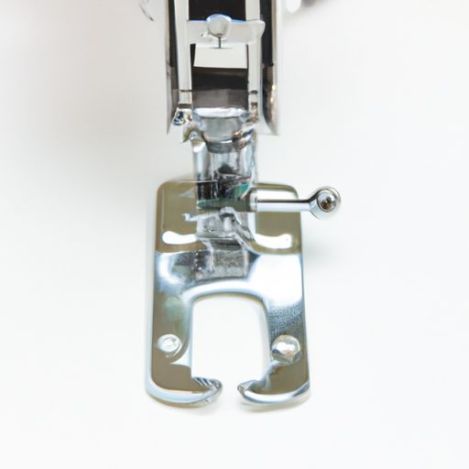
Tips for Properly Installing and Adjusting a Curved Needle Bracket 209007 Lower Looper
A needle bracket 209007 lower looper is an essential component of a household sewing machine, particularly for machines that require a curved needle. Properly installing and adjusting this bracket is crucial for ensuring smooth and accurate stitching. In this article, we will provide some tips on how to properly install and adjust a curved needle bracket 209007 lower looper on your sewing machine.
First and foremost, it is important to make sure that you have the correct needle bracket for your specific sewing machine model. The needle bracket 209007 lower looper is designed to work with machines that require a curved needle, so be sure to check your machine’s manual or consult with a professional to ensure compatibility.
Once you have confirmed that you have the correct needle bracket, the next step is to properly install it on your sewing machine. Start by turning off the machine and unplugging it from the power source to avoid any accidents. Carefully remove the old needle bracket, if applicable, by following the manufacturer’s instructions.
Next, take the new needle bracket 209007 lower looper and align it with the designated slot on your sewing machine. Gently slide the bracket into place, making sure that it is securely attached. Double-check to ensure that the bracket is properly aligned and seated before proceeding.
After installing the needle bracket, it is important to adjust it to the correct position for optimal stitching results. Start by turning the handwheel on your sewing machine to lower the needle into the bracket. The needle should be positioned in the center of the bracket, with the eye of the needle facing towards the front of the machine.
Once the needle is properly positioned, adjust the tension on the needle bracket 209007 lower looper to ensure smooth stitching. Most Sewing Machines have a tension adjustment knob or dial that can be used to tighten or loosen the tension on the needle bracket. Experiment with different tension settings until you find the one that works best for your specific sewing project.
In addition to adjusting the tension, it is also important to check the alignment of the needle bracket with the other components of your sewing machine. Make sure that the needle bracket is parallel to the feed dogs and presser foot to prevent any stitching issues.
Finally, test the needle bracket 209007 lower looper by sewing a few test stitches on a scrap piece of Fabric. Pay close attention to the quality of the stitches and make any necessary adjustments to the tension or alignment of the bracket as needed.
In conclusion, properly installing and adjusting a curved needle bracket 209007 lower looper on your household sewing machine is essential for achieving professional-quality stitching results. By following the tips outlined in this article, you can ensure that your sewing machine is properly set up for success. Remember to consult your machine’s manual or seek professional assistance if you encounter any difficulties during the installation or adjustment process.